Month: June 2021

  • Shopify Product Page Description Explained


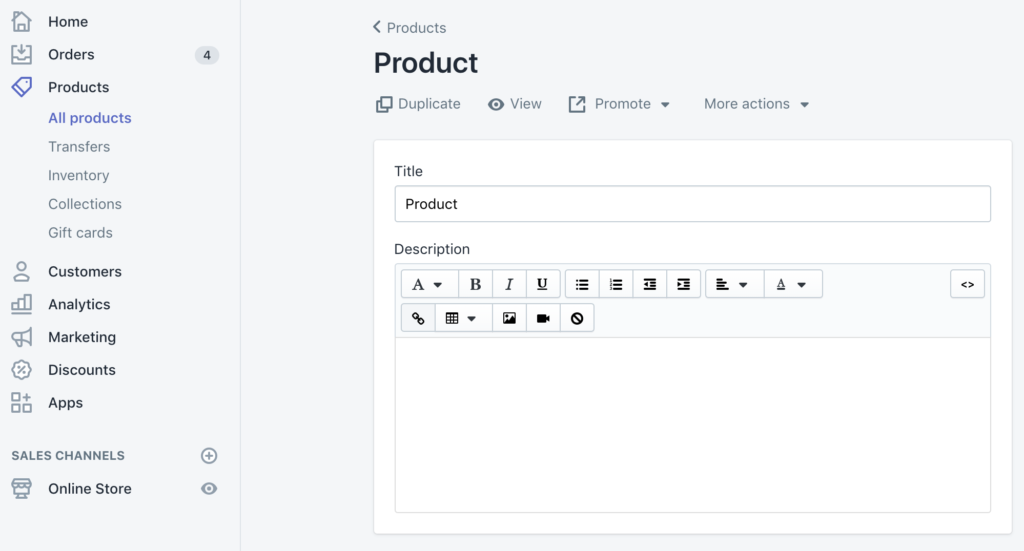
    The Product Page Description, is any content that you add in the Product’s admin page in the ‘Description‘ rich text area:

    Shopify product description

    The main goals of your product descriptions should be:

    • Explain what, exactly, the product is and what it does.
    • Describe the tangible properties of the product — materials, colours and any technical specifications.
    • Proactively answer shoppers’ questions and concerns about the product.
    • Influence the shopper to decide the product is a good fit for them and purchase it.
    • Integrate with your SEO strategy.
    • Illustrate your products by way of high quality imagery and video.

    By default, the product page description will show up on a column beside your main product image area. However, there are some other design options that you can consider! Within the theme, you can include the use of tabs, embed videos, and move either part or your whole description under the product image/below the fold!

    Product Description Configuration Options

    Tags

    Using tabs to organize some or all of your product’s description can make it clear and easier to access certain information, and is a good way to add more details about products in a small amount of space.

    When editing a product description, you can click on the [< >] ‘Show HTML’ button in the upper right of the ‘description’ rich text area to toggle into HTML mode.


    You can create tabs by following this HTML example. In the example code, the bold text should be customise to your specific content:

    <!–Start tab labels–>

    <ul class=”tabs”>

      <li><a class=”active” href=”#tab1″>Tab 1</a></li>

      <li><a href=”#tab2″>Tab 2</a></li>

      <li><a href=”#tab3″>Tab 3</a></li>

    </ul>

    <!–Start tab content–>

    <ul class=”tabs-content”>

      <li class=”active” id=”tab1″>Tab 1 content</li>

      <li id=”tab2″>Tab 2 content</li>

      <li id=”tab3″>Tab 3 content</li>

    </ul>

    Note that there are two distinct sections of code above. The first part, which is the first six lines, is used to create the labels that users see on the tabs. Then, the last six lines control the actual content that users see when clicking a specific tab.

    Video Embeds

    If you have a YouTube or Vimeo video you’d like to add into your product’s description, you can do so by adding in the embed code!

    For YouTube, you can grab the video embed code, by clicking Share > Embed > Select and Copy the whole iframe code. 

    To add the video embed code, in your Product Admin Page, you can click on the [< >] ‘Show HTML’ button in the upper right of the ‘description’ rich text area to toggle into HTML mode, you can then simply paste the embed here!

    Split Tag

    If you’d like part of the product’s description to display under the main product image, you can make use of the ‘split‘ option!

    In your Product Admin Page, you can click on the [< >] ‘Show HTML’ button in the upper right of the ‘description’ rich text area to toggle into HTML mode then, you’ll have to place this tag in your product description at the point where you’d like the description to ‘split’ into the two components:

    <!– split –>

    This is also a great way to add some additional content such as additional images, text, videos on your product page while still using the default product page template.

    Note: If you enter “<!– split –>” anywhere but the code view, this feature will not work. Also, the split tag does not appear in the rich text editor; you must be in code view to see it.

    The content that is after the ‘split’ tag will then show full width, beneath the main product image, product gallery, and product form.

    To take this a step further, you can create some interesting and creative layouts by using the ‘split’ tag along with the Column Framework!

  • Creating new product templates in Shopify

    1: Edit the code of the template you are using

    2: Under Templates click “Add new template”

    3: In the pop-up select product and give it a name, then click “Create template”

    Creating new product templates in Shopify

    4: In the new template file edit the first section: Change product-template to match your new name. For example: product-consumables-template

    5: Copy the name you gave the section. Under the Sections area, click “Add new section” and paste in the name you copied. Then click “Create section”

    6: Open the default “product-template.liquid” and copy the contents. Paste the contents into your new section file and Save it.

    7: In the new section file do a search or look for “{% schema %}”. You need to change the “name” and “class” of the schema. This will allow your page to have its own settings.

    For Example: 

    “name”: “Product”, > “name”: “Product | Consumables”,
    “class”: “product-template”, > “class”: “product-template product-consumables-template”,

    Again save the file.

    8: You can now edit the page.

  • How to create an audience segment in PushOwl


    Creating audience segments is very important to keep marketing messages applicable to the recipient. If you have a general message to let your customers know about then by all means send your push notification to your entire subscriber list.

    In this case, I need to create a segment based on which collections people have purchased from. Here are the steps I have taken to segment the subscribers.

    1. Head over to your Shopify dashboard. Click ‘apps’ on the left had menu if you are on a desktop computer or ‘store’ and then ‘apps’ if you are on a mobile device. Then locate the PushOwl app.
    Push Owl for Shopify

    2. Then click on your push notification app. Once inside the PushOwl app click ‘segments’ on the left hand side menu. Then click the green ‘+ New Segment’ button at the top right of the screen

    Segment button in Push Owl
    New segment in Push Owl

    3. Now give your new segment a name. I want to segment out customers who have purchased from our Bob Ross collection so I will call the segment ‘Bob Ross’.

    4. Next click ‘select condition’ and drop down to ‘purchased from collection’. At this stage you have quite a few options for setting up how PushOwl will create your segment but for my purposes I am going to select ‘subscriber -> ‘has’ – > purchased from, then type in the name of your collection, ‘Bob Ross’  -> at least once -> at anytime. 

    Creating a segment in Push Owl

    5. Once you are happy, click the ‘create segment’ button at the bottom right of the screen.

    Creating a segment in Push Owl

    If you have done this correctly, your segment will start to populate after a minute or two and you will be able to send a push notification to people who have only purchased from that particular collection.

  • How to redirect a URL in Shopify


    There might be numerous reasons why you need to redirect a URL.  Say for example you have a broken web page that is returning a 404 error but you know you have backlinks pointing to that page, you need to show the person browsing a similar page or alternative to the content that used to be there.

    In fact, fixing broken links on your website is an absolute must for SEO. Not only will fixing the broken link help with you overall SEO, you will get another backlink to your site for fixing it.

    4 Steps to creating a URL redirect on Shopify

    1) Locate the URL that you want to redirect. You can use AHREFs for this or Google Search console.
    In this example I am going to be using AHREFS. Go to Ahrefs dashboard. Type in the URL of the website or page you are working on. Down the left hand side menu, click ‘broken’ which is in the sub menu of ‘Backlinks’. This will show you all the broken backlinks on your website or page.

    2) In Shopify, click ‘online store’ in the left hand vertical menu and then ‘navigation’.

    Click 'navigation' in Shopify

    3) In the top right hand corner, click ‘create URL redirect’.

    4) Copy the URL of the page that is showing a 404 error and paste it into the ‘redirect from’ field. Now find the new page that you would like traffic to be redirected to if they land on the 404 page. Copy it’s URL and paste that URL in the ‘Redirect to’ field. Then click save. From now on, traffic going to the broken page will now be redirected to the new page you have chosen. Remember to chose a page that is a good alternative that offers the person good value and is similar to the what the page used to be about.

    add redirect to and redirect from in Shopify
  • How to find out the monetary value of a web page using AHREFS

    When we say ‘which web page is worth the most’ what we actually mean is, if you were paying for the keywords that appear on this page in Google PPC, this is approximately how much it would cost per month to run those ads.

    Google Search Console provides a fantastic amount of detailed reporting but if you need to know which of your pages is actually worth the most I suggest using AHREFS to find this out.

    Why this information is useful? Once you know you have a valuable web page you can try to monetise it if it is not already a ‘money page’.

    If the page is an article you have had written and you site is an commerce website you will obviously be linking through to your product page. It is notoriously difficult to rank product pages because of the fact that generally they just aren’t that interesting and many other sellers have more or less the same product page. So websites use content marketing to rank a page that gives real value to the reader and then link through to their product page to give the reader the opportunity to purchase. It is a very non-intrusive marketing technique. You are offering true value with an article and then simply giving the reader the option to buy if they like.
    Once you have a good content page that is ranking well, as long as you keep it updated there’s no reason for that page not to provide you with recurring income for months or even years.

    OK. here’s how you can find out what your web pages are worth.

    1. Go to AHREFS dashboard. Type in the web address of the website and hit the search button’
    AHREFS Dashboard

    2. On the left hand vertical menu, click ‘top pages 2.0’

    Top pages 2.0 Ahrefs

    3. Filter the results by value. This will show the highest value pages first

    Filter results by value

    4. If you are looking for results for just a particular set of pages on your site, blogs, collection pages, product pages etc. click ‘URL’ where you will be able to add a rule for example here I am just interested in what our blogs are worth so I will add URL contains ‘blog’. Type ‘blog’ where it says ‘enter value’ in grey.

    FILTER BY url contains in AHREFS

    5. Once again sort this by value and there you have it. You can now see your most valuable blog/article pages. So now you can get monetising this page if you haven’t already.

    Sort top pages by value